Architecture to create minimal APIs in .NET7:
Topics covered in this article are…:
- What is minimal APIs?
- Benefits of using Minimal APIs over controllers
- Some common misunderstandings about minimal APIs
- The architecture of Minimal APIs for a large-scale project (same like controllers)
- More verbose: Controllers often need to do more than just pass data between the client and the server. For example, they may also need to do things like authenticate users, validate input, and generate error messages. This can make controllers more verbose than minimal APIs, which are typically just a few lines of code.
- Less flexible: Controllers are often designed to work with a specific set of data or operations. This can make them less flexible than minimal APIs, which can be used for a wider variety of tasks.
- Difficult to test: Controllers often depend on other parts of the application, such as the database or the user interface. This can make them more difficult to test in isolation.
- Difficult to maintain. Controllers can become complex and difficult to understand over time. This can make them more difficult to maintain and update.
- Not a full-featured web framework: Minimal API is a lightweight framework that provides the bare essentials for building RESTful APIs. This means that it does not include features such as routing, dependency injection, or validation. These features can be added as needed, but they are not included by default.
- Not suitable for large or complex projects: This is another common misunderstanding about Minimal API. While it is true that Minimal API is not a good choice for all projects, it can be used for large and complex projects as well. In fact, some large and complex projects have been built using Minimal API.
- Difficult to learn and use: This is a misconception that is often perpetuated by people who have not actually used Minimal API. In reality, Minimal API is actually quite easy to learn and use. The code is concise and easy to read, and there are many resources available to help developers get started.
- Minimal API is not secure: This is another misconception that is not entirely accurate. Minimal API is secure by default because it uses HTTPS and other security features to protect data. However, it is important to use security best practices when developing Minimal API applications.
- Everything in one file called Program.cs: One thing that people are getting mixed up about is where to put all the code for their website. Some folks think that they have to put everything in one file called Program.cs. But actually, there’s a better way to do it using something called “extension methods.”
- Setting Up the Application
- Extending the WebApplication
- Creating Ping Endpoints
- Creating Weather Forecast Endpoints
- Simplifying Endpoint Registration
- Defining Model Classes
- Understanding ResultsWrapper and RouteGroupBuilderExtensions
- The builder is used to build the application.
- If the application is in the development environment, Swagger and SwaggerUI are enabled. Swagger helps document the API endpoints.
- The RegisterEndpoints() method is called to register the API endpoints. Will explain into Step 2 in this blog about this method in details.
- An extension method RegisterEndpoints is defined for the WebApplication class to make endpoint registration more organized.
- A global group named “api” is created using MapGroup.
- The PingEndpoints and WeatherForcastEndpoints are registered under the “api” group.
- The PingEndpoints class defines a static method Endpoints that registers ping endpoints.
- A group named “ping” is created using MapGroup.
- An anonymous GET endpoint named “ping” is added to the “ping” group.
- The PingV1 method handles the logic for the ping request. It logs a response and returns an “OK” result with ping information.
- The WeatherForcastEndpoints class defines a static method Endpoints that registers weather forecast endpoints.
- A group named “weather” is created using MapGroup.
- An anonymous GET endpoint named “weatherforecast” is added to the “weather” group.
- The GetWeatherForecast method generates weather forecast data and returns an “Ok” result with the forecast.
- Extension methods are defined to add common HTTP routes using MapGet, MapPost, MapPut, and MapDelete.
- There are also extension methods for anonymous routes.
- These methods make endpoint registration more concise and readable.
- APIResponseBase
is a generic class for API responses, including status code, success status, message, and result. - PingInfo represents the response data for the ping endpoint.
- WeatherForecast is a record that represents weather forecast data.
- ResultsWrapper is a utility that simplifies the creation of API responses by wrapping the data in a standardized format, including status codes and success flags.
- RouteGroupBuilderExtensions provides convenient extension methods to register different types of routes (GET, POST, PUT, DELETE) and anonymous routes. These methods enhance readability and reduce redundancy when registering endpoints.
What is minimal APIs?
In the previous versions of .NET, when you wanted to create an API – a way for different parts of your application to talk to each other over the internet – you would often create these things called “controllers.” Controllers are like the traffic cops of your application. They take in requests, figure out what needs to happen, and then send back responses.
Now, with .NET 7, they’ve introduced something called “minimal APIs.” Think of it like a simpler way to create these traffic cop-like things (controllers) for your APIs. Instead of writing a bunch of complex code to set up controllers and actions, you can do it in a more straightforward way.
Imagine you want to create an API to get information about books. With minimal APIs, you can just write a few lines of code to set up your “get books” operation. You don’t need to create a whole controller with methods and routes – it’s more direct and minimalistic.
So, if you’re used to controllers in MVC, think of minimal APIs as a quicker and easier way to build APIs without all the extra setup. It’s like streamlining the process of creating these communication points in your application, making it faster to get things up and running.
Benefits of using Minimal APIs over controllers:
For example, the following code shows how to create a controller action that returns a list of employees:
[HttpGet]
public IActionResult GetEmployees()
{
   return Ok(db.Employees.ToList());
}
This code is relatively simple, but it still requires a few lines of code to authenticate the user, validate the input, and generate an error message if something goes wrong.
In contrast, the following code shows how to create a minimal API that returns a list of employees:
app.MapGet("/employees", () => db.Employees.ToList());This code is much shorter and simpler than the controller action code. It does not need to do any authentication, validation, or error handling. This makes it a good choice for a simple API that does not need to be as secure or robust as a full-blown controller.
For example, a controller that is designed to return a list of employees may not be able to be easily modified to return a list of customers or a list of products. In contrast, a minimal API that simply returns a list of data can be easily modified to return any type of data.
For example, a controller that is designed to return a list of employees may depend on the database to retrieve the data. This means that the controller cannot be easily tested without the database being available. In contrast, a minimal API that simply returns a list of data can be easily tested in isolation, without the need for any other dependencies.
For example, a controller that is responsible for a large number of operations may become difficult to keep track of. This can make it difficult to find and fix bugs, or to add new features. In contrast, a minimal API that is responsible for a single operation is typically much easier to maintain.
Some common misunderstandings about minimal APIs :
Some people mistakenly believe that this makes Minimal API a less powerful or capable framework. However, the reality is that Minimal API is often a better choice for small and simple projects because it is easier to learn and use. Additionally, the flexibility of Minimal API allows developers to add the features they need without adding unnecessary complexity.
The key to using Minimal API for large or complex projects is to carefully consider the features that are needed and to add those features as needed. It is also important to use good design principles and to follow best practices for building scalable and reliable applications.
Of course, any new framework can take some time to learn, but Minimal API is no more difficult to learn than other popular frameworks such as ASP.NET MVC or Spring Boot. In fact, many developers find that Minimal API is easier to learn because it is more concise and straightforward.
This means that developers should carefully consider the security implications of their applications and take steps to mitigate any potential risks. For example, developers should use strong passwords and encryption, and they should monitor their applications for security vulnerabilities.
Overall, minimal API is a powerful and flexible framework that can be used for a variety of projects, including small, simple projects and large, complex projects. It is important to be aware of its limitations, but it is also important to remember that it is a capable framework that can be used to build high-quality applications.
Minimal APIs are meant to help you create web pages in a simple way. You can start making your website in the Program.cs file using special words like app.MapGet and app.MapPost. But that doesn’t mean you have to stuff everything into that one file.
Here’s the cool part: with extension methods, you can make your website code neat and organized. Extension methods let you add new things to existing stuff without changing the original stuff. This is a fancy way of saying that you can split your website code into different pieces without making a mess.
How to implement it? Let’s move forward to our next section for same 🙂
The architecture of Minimal APIs for large scale project (same as controllers):
As stated earlier, with the help of the extension method, we can easily split our endpoints OR apis into multiple files. We don’t need to stick with the traditional structure of controllers as we are doing earlier. In below, example, we are following one directory structure but it is not mandatory to follow the same in your case.
We will implement it by following below steps:
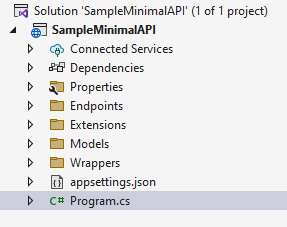
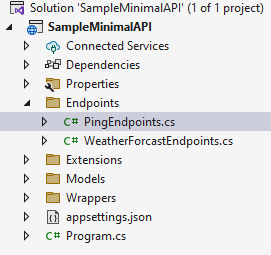
Our project structure is look like this:
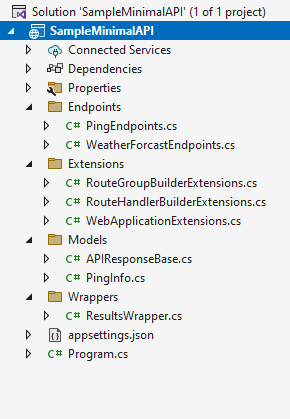
Step 1: Setting Up the Application:
The code starts with the SampleMinimalAPI/Program.cs file, which is the entry point of the application. Here’s a snippet of what the code looks like:
using SampleMinimalAPI.Extensions;

var builder = WebApplication.CreateBuilder(args);

// Add services to the container.
// Learn more about configuring Swagger/OpenAPI at https://aka.ms/aspnetcore/swashbuckle
builder.Services.AddEndpointsApiExplorer();
builder.Services.AddSwaggerGen();

var app = builder.Build();

// Configure the HTTP request pipeline.
if (app.Environment.IsDevelopment())
{
    app.UseSwagger();
    app.UseSwaggerUI();
}

app.RegisterEndpoints();
app.UseHttpsRedirection();

app.Run();
Explanation:
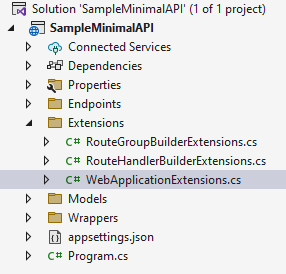
Step 2: Extending The WebApplication:
The SampleMinimalAPI/Extensions/WebApplicationExtensions.cs file contains an extension method for registering endpoints:
using SampleMinimalAPI.Endpoints;

namespace SampleMinimalAPI.Extensions;

public static class WebApplicationExtensions
{
    public static void RegisterEndpoints(this WebApplication application)
    {
        var globalGroupV1 = application.MapGroup("api");

        PingEndpoints.Endpoints(globalGroupV1);
        WeatherForcastEndpoints.Endpoints(globalGroupV1);
    }
}
Explanation:
Step 3: Creating Ping Endpoints:
The SampleMinimalAPI/Endpoints/PingEndpoints.cs file defines the ping endpoint:
using SampleMinimalAPI.Extensions;
using SampleMinimalAPI.Models;
using SampleMinimalAPI.Wrappers;

namespace SampleMinimalAPI.Endpoints;

public class PingEndpoints
{
    public static void Endpoints(RouteGroupBuilder builder)
    {
        var group = builder.MapGroup("ping");

        group.GetAnonymous("ping", PingV1)
            .AddMetaDataAnonymous<PingInfo>();


    }

    internal static IResult PingV1()
    {
        // ... code to handle ping request and log the response

        return ResultsWrapper.Ok(pingInfo);

    }
}
Explanation:
Step 4: Creating Weather Forecast Endpoints:
The SampleMinimalAPI/Endpoints/WeatherForcastEndpoints.cs file defines weather forecast endpoints:
using SampleMinimalAPI.Extensions;
using SampleMinimalAPI.Models;
using SampleMinimalAPI.Wrappers;

namespace SampleMinimalAPI.Endpoints;

public static class WeatherForcastEndpoints
{
    public static void Endpoints(RouteGroupBuilder builder)
    {
        var group = builder.MapGroup("weather");

        group.GetAnonymous("weatherforecast", GetWeatherForecast)
            .AddMetaDataAnonymous<PingInfo>();
    }

    internal static IResult GetWeatherForecast()
    {
        // ... code to generate weather forecast data ...

        return ResultsWrapper.Ok(forecast);
    }
}
Explanation:
Step 5: Simplifying Endpoint Registration:
The SampleMinimalAPI/Extensions/RouteGroupBuilderExtensions.cs file contains extension methods to simplify endpoint registration:

namespace SampleMinimalAPI.Extensions;
public static class RouteGroupBuilderExtensions
{
	public static RouteHandlerBuilder Get(this RouteGroupBuilder webApplication, string route, Delegate action, string routeName = null)
	{
    	// ... logic to register a GET route ...
	}

	// ... similar extension methods for POST, PUT, DELETE, and anonymous routes ...
}
Explanation:
Step 6: Defining Model Classes:
The model classes are defined to structure the API responses:
Step 7: Understanding ResultsWrapper and RouteGroupBuilderExtensions:
Note: There’s a working example on GitHub. In the example’s source code, a directory named “Endpoints” was created to house all the endpoints. However, for your project, feel free to use any directory structure that suits your needs.
Let’s connect with us to get a GIT link
I like to thank you Hardipsinh Jadeja for narrating this article and Nick Chapsas from whom I learn useful points.
Do You Need more information?
For any further information / query regarding Technology, please email us at info@varianceinfotech.in
OR call us on +1 630 534 0223 / +91-7016851729, Alternately you can request for information by filling up Contact Us
Chirag Darji
Chirag is a Business strategist, helping Variance Infotech to spread their expertise in Dotnet development & CRM solutions for all industries among businesses which has been proven a Boost-up factor in the digital aura worldwide.
 Please wait...
Leave a Reply