Data loader vs. web-based import wizard?
Installing & Functions:
The Salesforce Data Loader can be installed by navigating to the setup menu in Salesforce, and heading to the Data Loader tab, here you will find download links both for Windows & Mac. Once installed, you will be greeted by a screen that looks like the below, simple right? As mentioned, the Data Loader is very simple and easy to use, but you must ensure that you know what you’re doing or the results can be disastrous (There’s no going back from changing or deleting a bunch of records without a backup!).
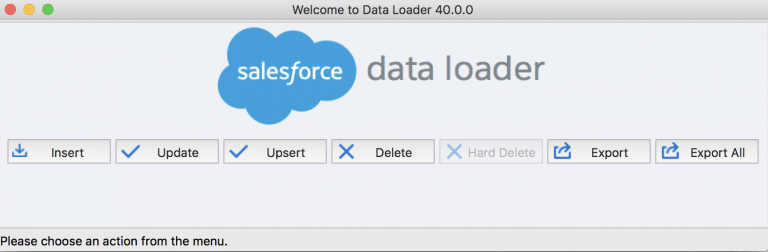
- Insert – Gives you the ability to insert new records into Salesforce
- Update – Enables you to make changes to existing records inside of Salesforce
- Upsert – Combines the above options, updates a record if it already exists, or if not, inserts it
- Delete – Deletes records from the system
- Hard Delete – While the delete option stores information in the Recycle Bin for a limited period, Hard Delete will remove straight away
- Export – Export information from the system into a CSV format
- Export All – While Export only extracts “live” records, Export All will also remove anything that is in the recycle bin as well as anything that has been archived (Some records are archived after a period of time such as tasks)

Salesforce Data Loader Step-by-Step Guide:
Please follow the steps below to gain a hands on experience in using data loader. Starting with data loader could be time taking. Use the tips in the below figure to get a jump start.
In order to now finally get data into your environment open the data loader and choose what you want to do.
- You can click insert, update, upsert, delete or hard delete (the deleted records will not be stored in the recycle bin) based on what you want to do.
- Then you’ll need to enter your salesforce username and password to login.
- After you’ve logged in you will need to choose an object to which you want to upload the data. So if you want to insert account records, you choose accounts, if you want to upload leads, you choose leads.
- If the object you want to upload the data too doesn’t show up in the list you can check from show all objects to see a list of all objects available.
- Once you selected the object, click browse to select the CSV file
- Then you’ll only need to click ‘Next’ and the CSV upload will start once you click ‘OK’.
- If you decided to upsert data, your file needs to contain a column that acts as ID for the records. In other words a column in the CSV file against which the tool checks in the system.
- This column can be an external ID (a custom field called External ID) or the Salesforce record ID.
- Select which field to use for matching and click next to continue.
- While you are using the data loader you also need to define how the columns in your CSV file map to your Salesforce fields.
- You can use an existing mapping system or create a new way to map the records.
- Lastly you will need to hit Finish and yes to confirm.
Conclusion:
Thanks For the Reading www.varianceinfotech.com

Do You Need more information?
For any further information / query regarding Technology, please email us at info@varianceinfotech.in
OR call us on +1 630 534 0223 / +91-7016851729, Alternately you can request for information by filling up Contact Us
 Please wait...
Leave a Reply